【注意】最后更新于 March 2, 2019,文中内容可能已过时,请谨慎使用。
一、ByteBuf工作原理
1.为什么Netty扩展NIO中ByteBuffer类?
主要原因ByteBuffer设计不足几点:
-
ByteBuffer一旦分配完成,长度固定,不支持动态扩展和收缩,当需要编码的POJO对象大于分配容量时发生索引越界异常;
-
ByteBuffer的原理就是capacity(容量),position(位置),limit(限制)三个变量,来创建ByteBuffer方式’ByteBuffer.allocate(8)',现在capacity=8,position=0,limit=8,
进行写操作,写两个字节,现在capacity=8,position=2,limit=8;变成读模式,手动调用flip()方法才能读到数据,现在capacity=8,position=0,limit=2;手动触发flip() 才能继续读数据,对API不了解很容易出错。
-
ByteBuffer的API功能有限!高级API自己扩展实现。
2.ByteBuf工作原理
ByteBuf提供了两个指针变量来支持连续的读写操作 - readerIndex用于读操作,writerIndex用于write操作。下图显示了如何通过两个指针
将缓冲区分割成三个区域:
1
2
3
4
5
6
7
|
      +-------------------+------------------+------------------+
      | discardable bytes |  readable bytes  |  writable bytes  |
      |                   |     (CONTENT)    |                  |
      +-------------------+------------------+------------------+
      |                   |                  |                  |
      0      <=      readerIndex   <=   writerIndex    <=    capacity
|
(1).读取(实际内容)
这部分是存储实际数据。方法名称以read或skip开头的任何操API作将获取或跳过当前readerIndex中的数据,并将其增加读取字节数。
如果读操作的参数也是一个ByteBuf,并且没有指定目标索引,则指定ByteBuf的writerIndex会一起增加
如果没有足够的内容,则引发IndexOutOfBoundsException。新分配,打包或复制缓冲区的readerIndex的默认值为0。
1
2
3
4
5
|
// Iterates the readable bytes of a buffer.
 ByteBuf buffer = ...;
 while (buffer.isReadable()) {
     System.out.println(buffer.readByte());
 }
|
(2).写
这部分是一个未定义的空间,需要填写。名称以write开头的任何操作将在当前writerIndex处写入数据,并将其增加写入字节数。
如果写操作的参数也是ByteBuf,并且没有指定源索引,则指定ByteBuf 的readerIndex会一起增加。
如果没有足够的可写字节,则引发IndexOutOfBoundsException。新分配的缓冲区的writerIndex的默认值是0.
包装或复制的缓冲区的writerIndex的默认值是缓冲区的容量。
1
2
3
4
5
|
 // Fills the writable bytes of a buffer with random integers.
 ByteBuf buffer = ...;
 while (buffer.maxWritableBytes() >= 4) {
     buffer.writeInt(random.nextInt());
 }
|
(3).Discardable bytes
这个段包含已经被读取操作读取的字节。最初,这个段的大小是0,但是随着读取操作的执行,它的大小增加到了writerIndex。
读取的字节可以通过调用discardReadBytes()来回收未使用的区域,如下图所示:
 1
 2
 3
 4
 5
 6
 7
 8
 9
10
11
12
13
14
15
16
17
|
BEFORE discardReadBytes()

      +-------------------+------------------+------------------+
      | discardable bytes |  readable bytes  |  writable bytes  |
      +-------------------+------------------+------------------+
      |                   |                  |                  |
      0      <=      readerIndex   <=   writerIndex    <=    capacity


  AFTER discardReadBytes()

      +------------------+--------------------------------------+
      |  readable bytes  |    writable bytes (got more space)   |
      +------------------+--------------------------------------+
      |                  |                                      |
 readerIndex (0) <= writerIndex (decreased)        <=        capacity
|
请注意,在调用discardReadBytes()之后,不能保证可写字节的内容。可写入的字节在大多数情况下不会被移动,甚至可能被完全不同的数据填充,这取决于底层的缓冲区实现。
(4).清除
您可以通过调用clear()将readerIndex和writerIndex设置为0。它不清除缓冲区内容(例如,用0填充),但只是清除了两个指针。
另请注意,此操作的语义与Buffer.clear()不同。
 1
 2
 3
 4
 5
 6
 7
 8
 9
10
11
12
13
14
15
16
17
|
 BEFORE clear()

      +-------------------+------------------+------------------+
      | discardable bytes |  readable bytes  |  writable bytes  |
      +-------------------+------------------+------------------+
      |                   |                  |                  |
      0      <=      readerIndex   <=   writerIndex    <=    capacity


  AFTER clear()

      +---------------------------------------------------------+
      |             writable bytes (got more space)             |
      +---------------------------------------------------------+
      |                                                         |
      0 = readerIndex = writerIndex            <=            capacity
|
二、ByteBuf的API说明
ByteBuf抽象方法很多,这里只做具体方法做说明。
三、ByteBuf的源码分析
1.ByteBuf主要类继承关系图
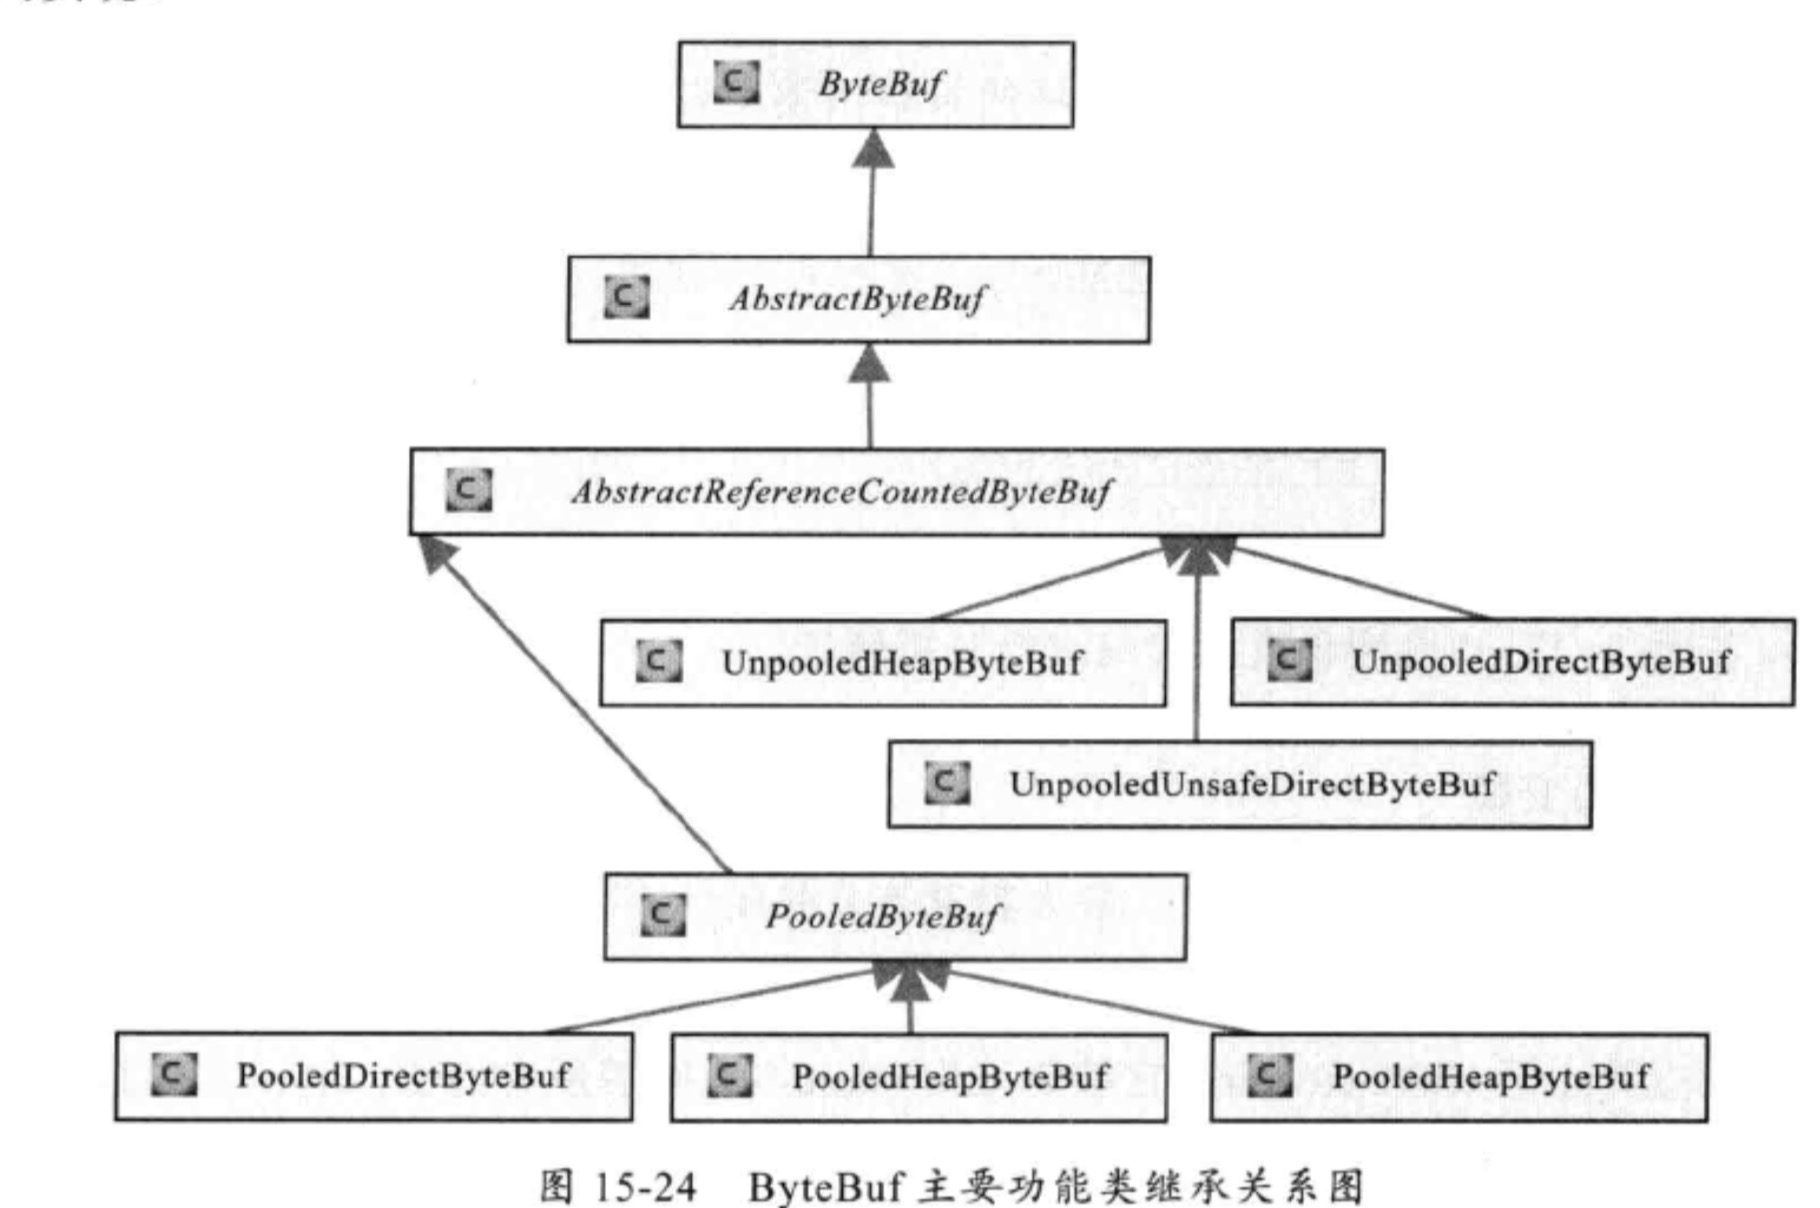
从内存分配的角度看,分2类:
ByteBuf的最佳实践是在I/O通信线程读写缓冲区使用DirectByteBuf,后端业务消息的编解码模块使用HeapByteBuf,这样组合可以达到性能最优。
从内存问收角度看,ByteBuf分为两类:基于对象池的ByteBuf和普通ByteBuf。两者的主要区別就基于对象池的ByteBuf可以重用ByteBuf对象,它自己维护了一个内存
池,可以循环利用创建的提升内存的使用效率,降低由于高负载导致的频繁GC。测试表明使用内存池后的在高负载、大并发的冲击下内存和GC更加平稳。
2.AbstractByteBuf 源码分析
(1).内部结构实现
1
2
3
4
5
6
7
|
      +-------------------+------------------+------------------+
      | discardable bytes |  readable bytes  |  writable bytes  |
      |                   |     (CONTENT)    |                  |
      +-------------------+------------------+------------------+
      |                   |                  |                  |
      0      <=      readerIndex   <=   writerIndex    <=    capacity
|
 1
 2
 3
 4
 5
 6
 7
 8
 9
10
11
12
13
14
15
16
17
18
19
20
21
22
23
24
25
26
|
public abstract class AbstractByteBuf extends ByteBuf {
    private static final InternalLogger logger = InternalLoggerFactory.getInstance(AbstractByteBuf.class);
    private static final String PROP_MODE = "io.netty.buffer.bytebuf.checkAccessible";
    private static final boolean checkAccessible;

    static {
        checkAccessible = SystemPropertyUtil.getBoolean(PROP_MODE, true);
        ...
    }

    static final ResourceLeakDetector<ByteBuf> leakDetector =
            ResourceLeakDetectorFactory.instance().newResourceLeakDetector(ByteBuf.class); //资源泄漏检查

    int readerIndex;//读索引
    int writerIndex;//写索引
    private int markedReaderIndex;//标记读索引,主要用于重置作用
    private int markedWriterIndex;//标记写索引,主要用于重置作用
    private final int maxCapacity;      //最大容量

    protected AbstractByteBuf(int maxCapacity) {
        if (maxCapacity < 0) {
            throw new IllegalArgumentException("maxCapacity: " + maxCapacity + " (expected: >= 0)");
        }
        this.maxCapacity = maxCapacity;
    }
}
|
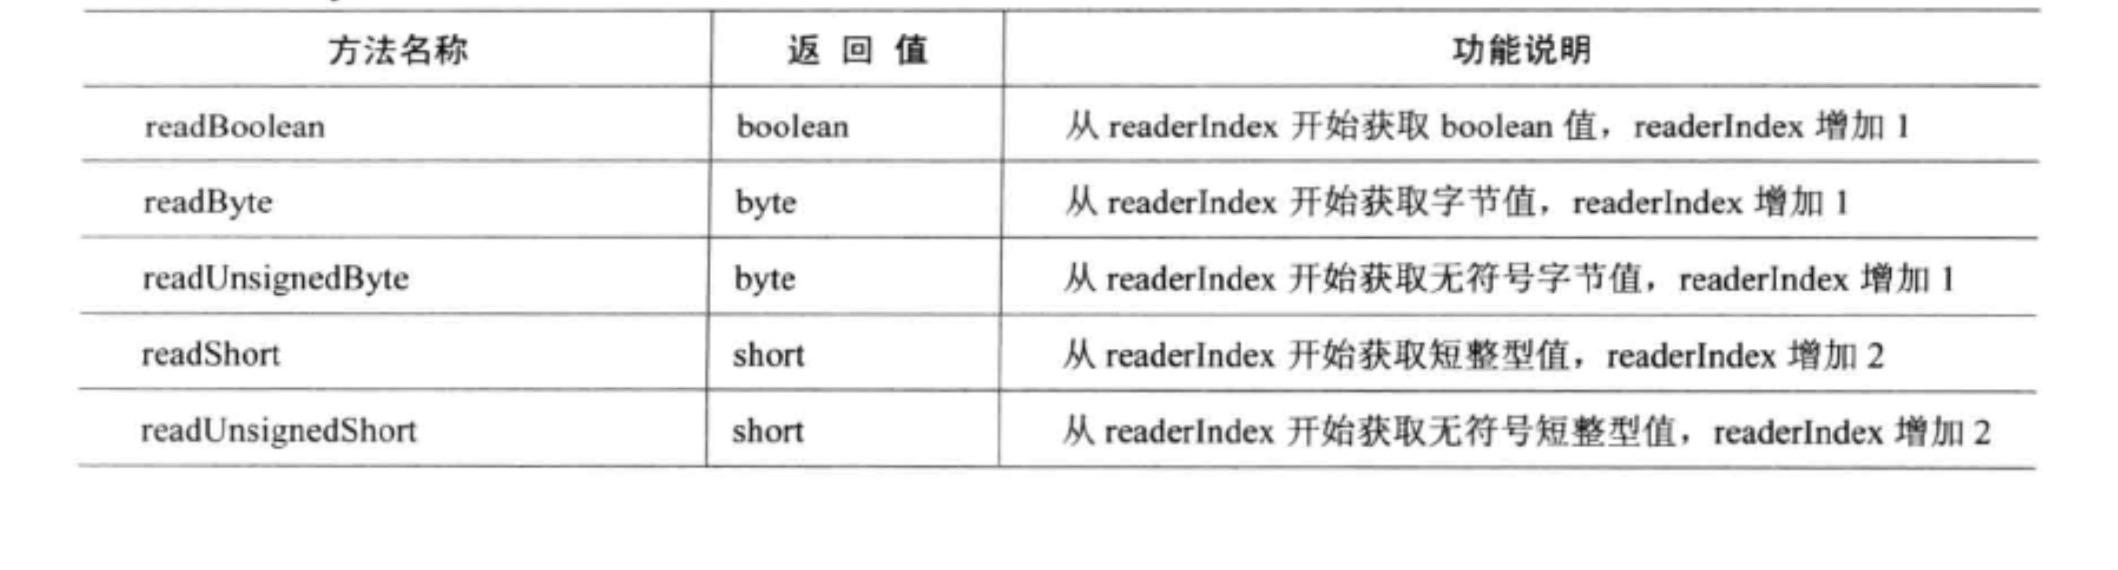
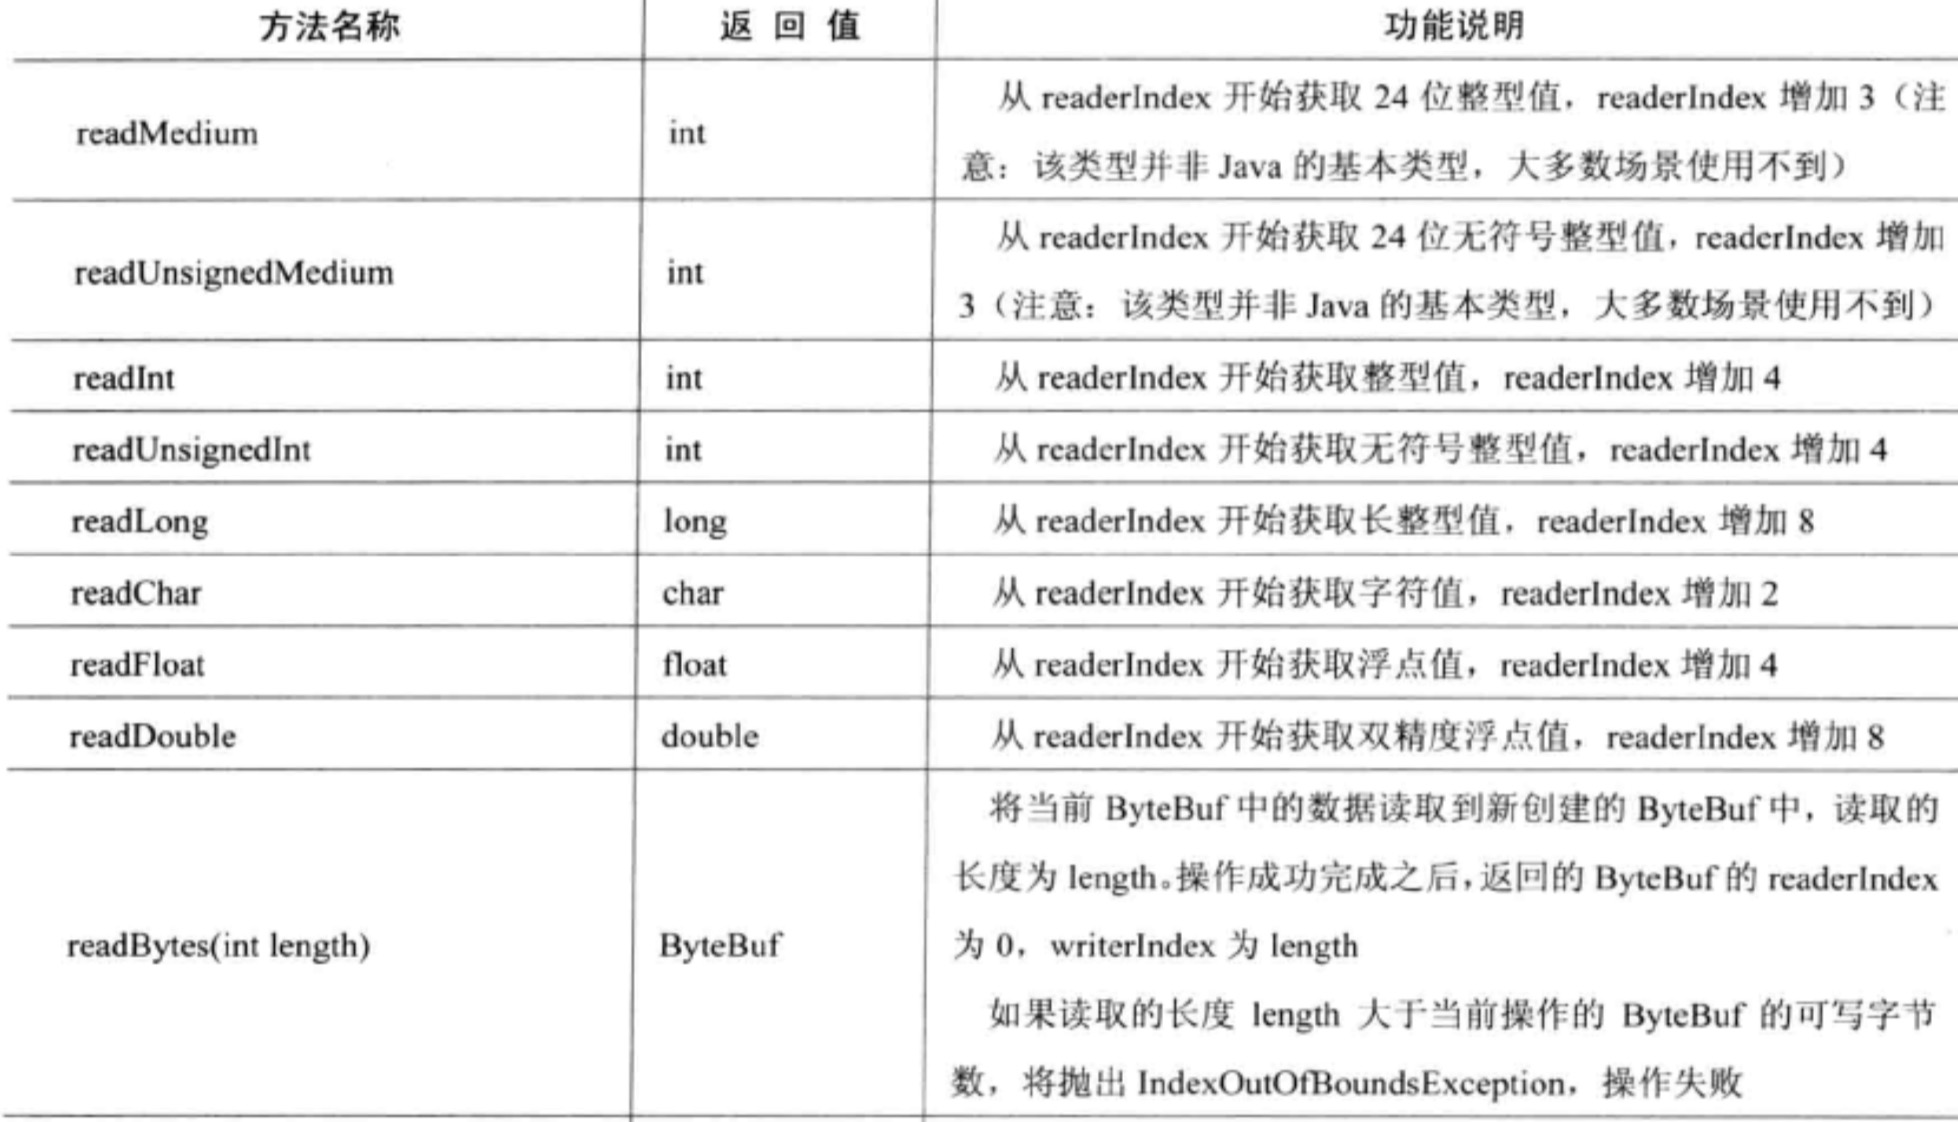
(2).读操作
a. read基本类型1
- byte
 1
 2
 3
 4
 5
 6
 7
 8
 9
10
11
12
13
14
15
16
17
18
19
20
21
22
23
24
25
|
   @Override
    public byte readByte() {
        checkReadableBytes0(1); //验证readerIndex
        int i = readerIndex;
        byte b = _getByte(i);   //_getByte是抽象方法,子类实现。这里运用模版方法模式
        readerIndex = i + 1;    //修改readerIndex
        return b;
    }

    //验证读取是否越界readerIndex
    private void checkReadableBytes0(int minimumReadableBytes) {
        ensureAccessible();
        if (readerIndex > writerIndex - minimumReadableBytes) {// 判断是否越界writerIndex
            throw new IndexOutOfBoundsException...
        }
    }

    //每个试图访问缓冲区内容的方法都应该调用它,以检查缓冲区是否在之前释放。
    //checkAccessible 是访问验证,在配置中设置io.netty.buffer.bytebuf.checkAccessible,默认是true
    //refCnt() 引用计数为0,说明已经释放对象
    protected final void ensureAccessible() {
        if (checkAccessible && refCnt() == 0) {
            throw new IllegalReferenceCountException(0);
        }
    }
|
- 对基本类型boolean,short,int,long,char,float,double操作
 1
 2
 3
 4
 5
 6
 7
 8
 9
10
11
12
13
14
15
16
17
18
19
20
21
22
23
24
25
26
27
28
29
30
31
32
33
34
35
36
37
38
39
40
41
42
43
|
    @Override
    public boolean readBoolean() {
        return readByte() != 0;
    }
    //short占用2字节
    @Override
    public short readShort() {
        checkReadableBytes0(2);
        short v = _getShort(readerIndex); //_getShort 抽象方法
        readerIndex += 2;
        return v;
    }
    //int占用4字节
    @Override
    public int readInt() {
        checkReadableBytes0(4);
        int v = _getInt(readerIndex);
        readerIndex += 4;
        return v;
    }
    //long占用8字节
    @Override
    public long readLong() {
        checkReadableBytes0(8);
        long v = _getLong(readerIndex);
        readerIndex += 8;
        return v;
    }
    //char调用readShort,强转化char
     @Override
     public char readChar() {
         return (char) readShort();
     }
     //float调用readInt,Float.intBitsToFloat转化float
     @Override
     public float readFloat() {
         return Float.intBitsToFloat(readInt());
     }
     //double调用readInt,Double.longBitsToDouble转化double
     @Override
     public double readDouble() {
         return Double.longBitsToDouble(readLong());
     }
|
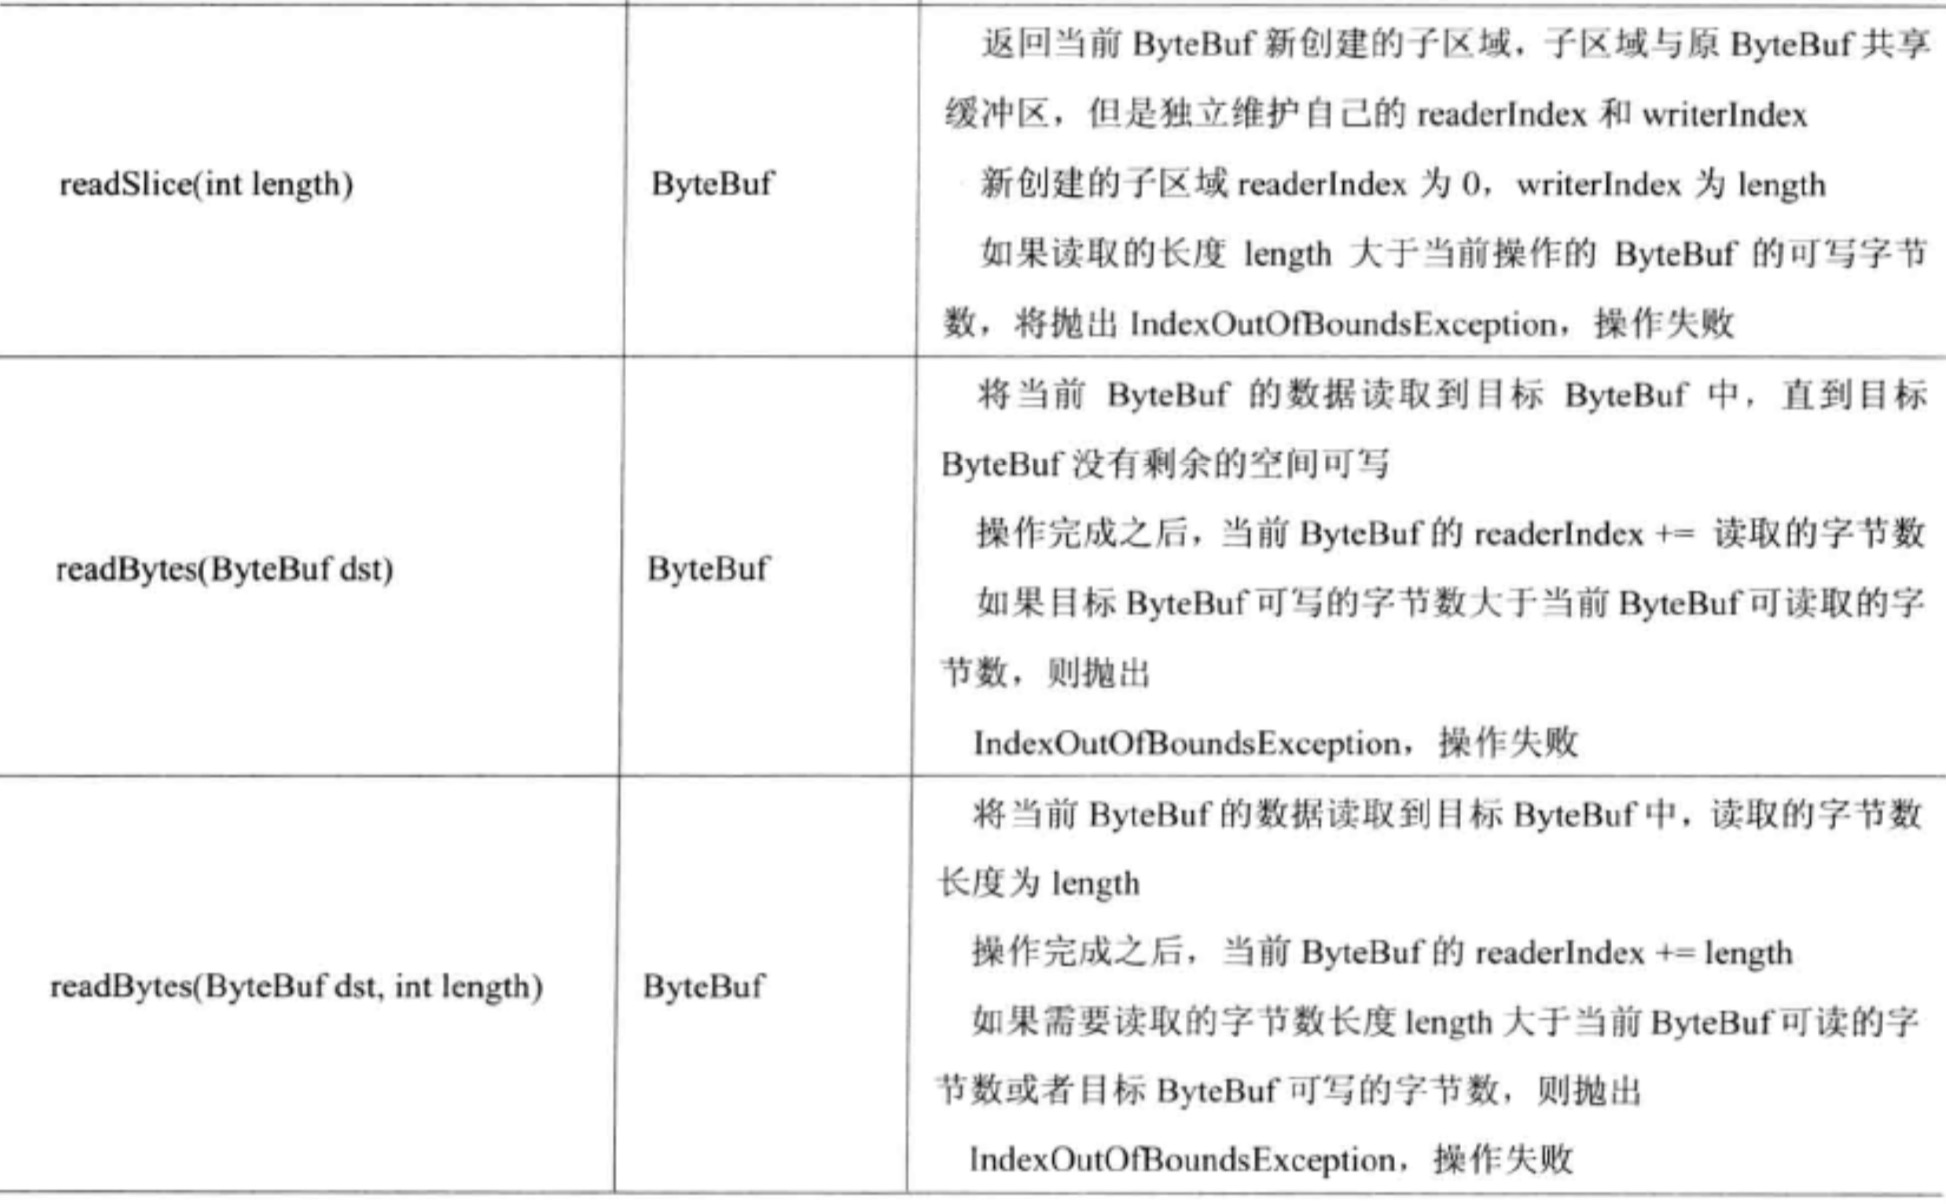
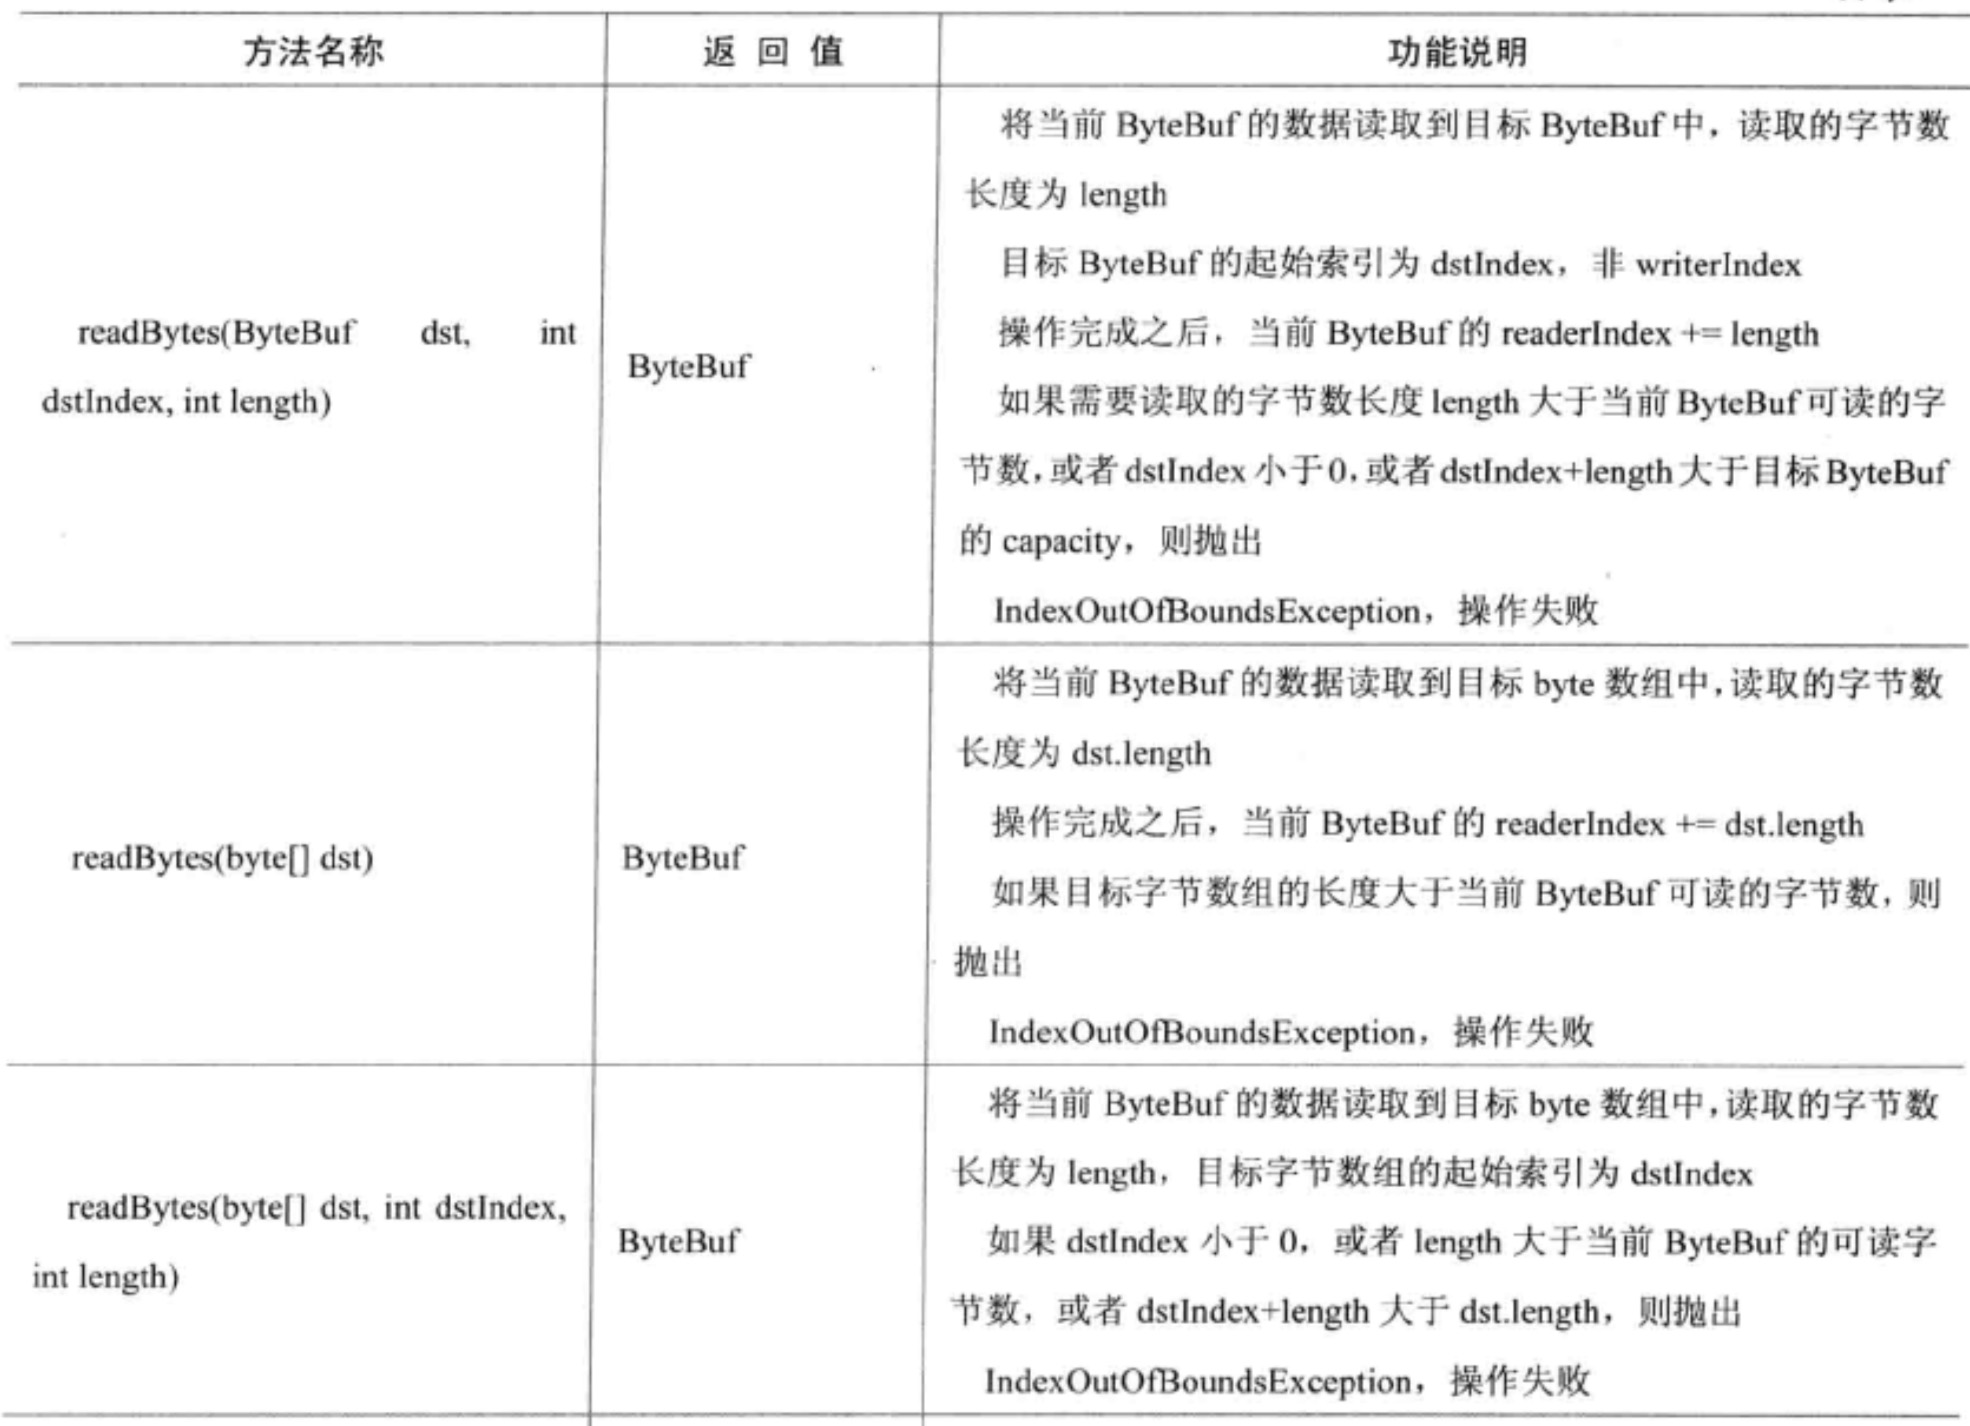
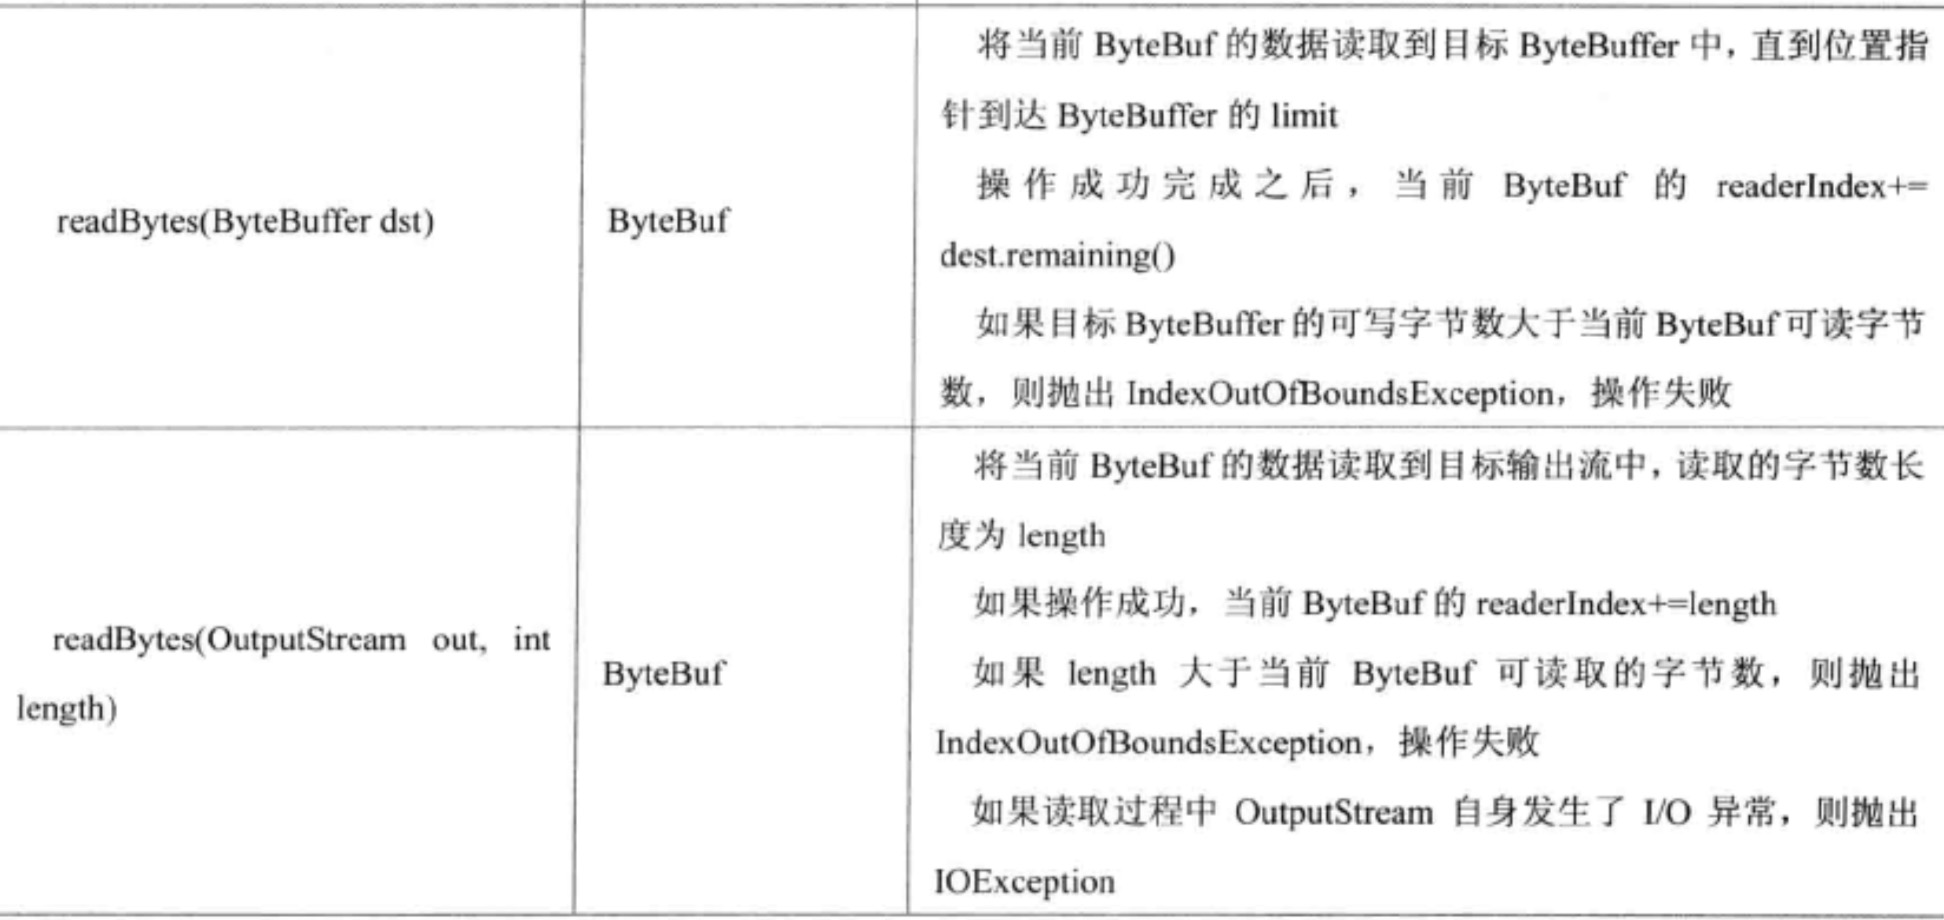
b. readBytes(byte[] dst, int dstIndex, int length)
1
2
3
4
5
6
7
|
    @Override
    public ByteBuf readBytes(byte[] dst, int dstIndex, int length) {
        checkReadableBytes(length);        //验证
        getBytes(readerIndex, dst, dstIndex, length); //getBytes抽象方法
        readerIndex += length;
        return this;
    }
|
(3).写操作
a.write基本类型
- byte
 1
 2
 3
 4
 5
 6
 7
 8
 9
10
11
12
13
14
15
16
17
18
19
20
|
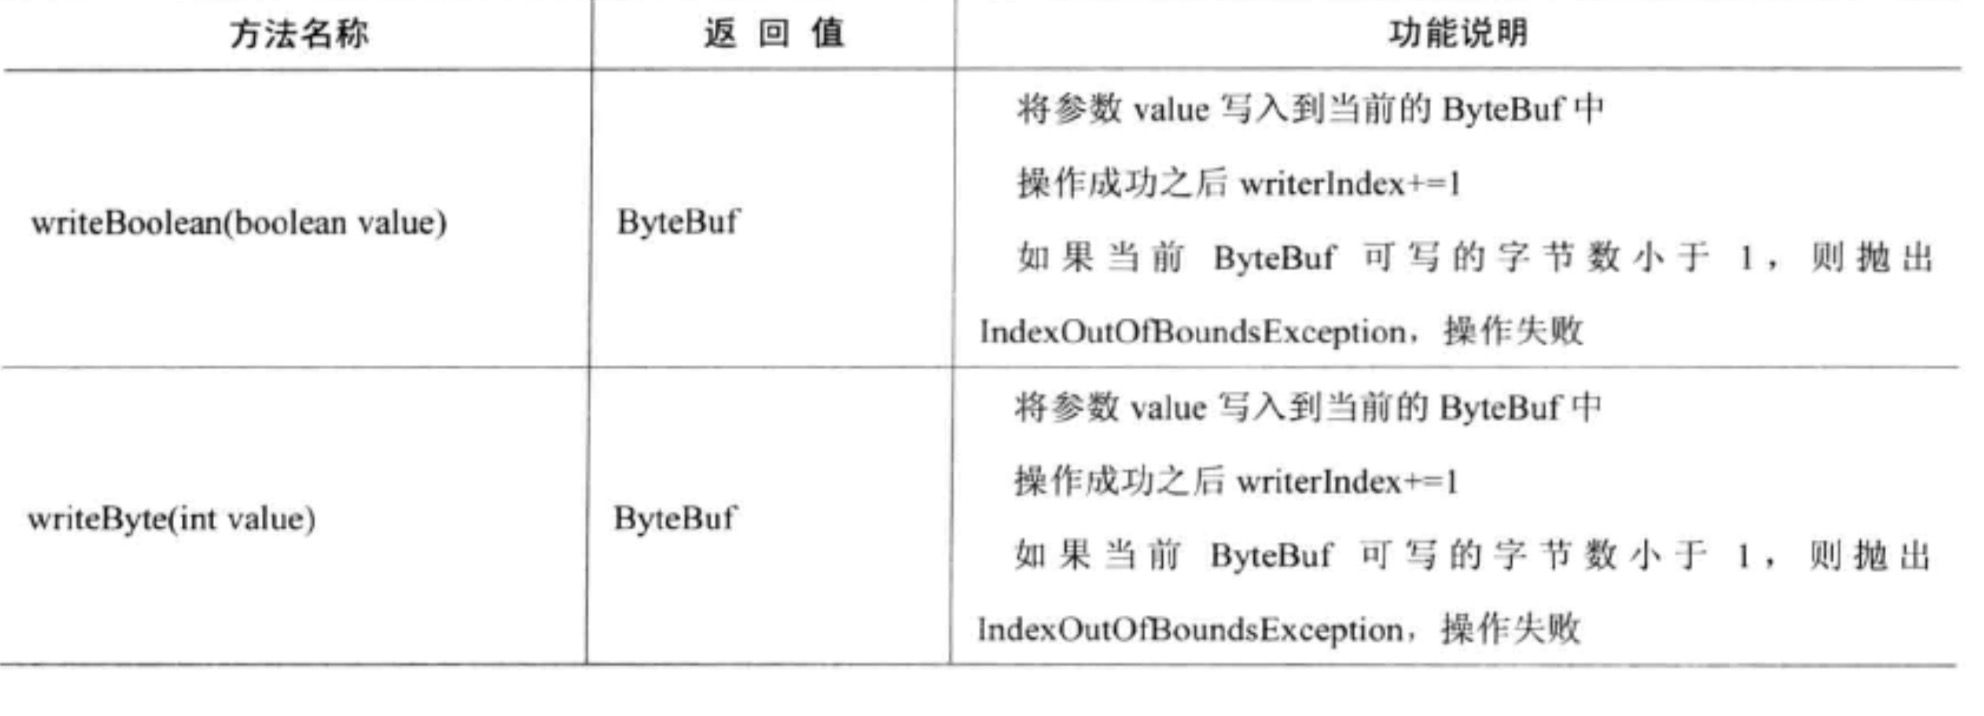
    @Override
    public ByteBuf writeByte(int value) {
        ensureWritable0(1);    //验证,动态扩容
        _setByte(writerIndex++, value);
        return this;
    }
   final void ensureWritable0(int minWritableBytes) {
        ensureAccessible();
        //writableBytes:capacity() - writerIndex
        if (minWritableBytes <= writableBytes()) {//判断写的容量
            return;
        }
        if (minWritableBytes > maxCapacity - writerIndex) {
            throw new IndexOutOfBoundsException...
        }
        //alloc()获取ByteBufAllocator#calculateNewCapacity获取新容量大小,以及大小2次方
        int newCapacity = alloc().calculateNewCapacity(writerIndex + minWritableBytes, maxCapacity); //动态扩容
        // 扩容新容量
        capacity(newCapacity);
    }
|
为什么需要动态扩展?
很多时候都是依据经验来判断Pojo对象的大小,如果这个估计值偏大则造成内存浪费,如果偏小直接抛出异常,这种做法对用户非常不友好。
而Netty的ByteBuf支持动态扩展,为了保证安全,可以指定最大容量。
calculateNewCapacity方法AbstractByteBufAllocator抽象类实现;
 1
 2
 3
 4
 5
 6
 7
 8
 9
10
11
12
13
14
15
16
17
18
19
20
21
22
23
24
25
26
27
28
29
30
31
32
|
    @Override
    public int calculateNewCapacity(int minNewCapacity, int maxCapacity) {
        ...参数验证
        //CALCULATE_THRESHOLD = 1048576 * 4
        final int threshold = CALCULATE_THRESHOLD; // 4 MiB page

        if (minNewCapacity == threshold) {
            return threshold;
        }

        // If over threshold, do not double but just increase by threshold.
        //如果超过阈值,按阈值累加
        if (minNewCapacity > threshold) {
            int newCapacity = minNewCapacity / threshold * threshold;
            //minNewCapacity / threshold 处理成newCapacity是threshold倍数
            if (newCapacity > maxCapacity - threshold) {
                newCapacity = maxCapacity;
            } else {
                newCapacity += threshold;
            }
            return newCapacity;
        }

        // Not over threshold. Double up to 4 MiB, starting from 64.
        //不超过阈值。从64开始,以2倍扩容,增加到4Min。
        int newCapacity = 64;
        while (newCapacity < minNewCapacity) {
            newCapacity <<= 1;
        }

        return Math.min(newCapacity, maxCapacity);
    }
|
计算扩容新容量大小原理:
设置阀门值是4MB,如果新增的内存空间大于这个值,不采用倍增,而采用每次步进4MB的方式。如果扩容之后的新容量小于阀值,则以64进行倍增 。
为什么这样做原因?
不希望一次增加容量太小,导致需要频繁的扩容,不希望一次增加太多,造成空间上的浪费。因此,在内存比较小的时候(<4MB)的时候,倍增64->128->256字节,这种方式大多数应用可以接收
当内存达到阀值时,再倍增就会带来额外的内存浪费,例如10MB->20MB,因此使用步增的方式进行扩张。
- 写操作基本数据boolean,short,int,long,char,float,double
 1
 2
 3
 4
 5
 6
 7
 8
 9
10
11
12
13
14
15
16
17
18
19
20
21
22
23
24
25
26
27
28
29
30
31
32
33
34
35
36
37
38
39
40
41
42
43
44
|
@Override
public ByteBuf writeBoolean(boolean value) {
writeByte(value ? 1 : 0);
return this;
}
@Override
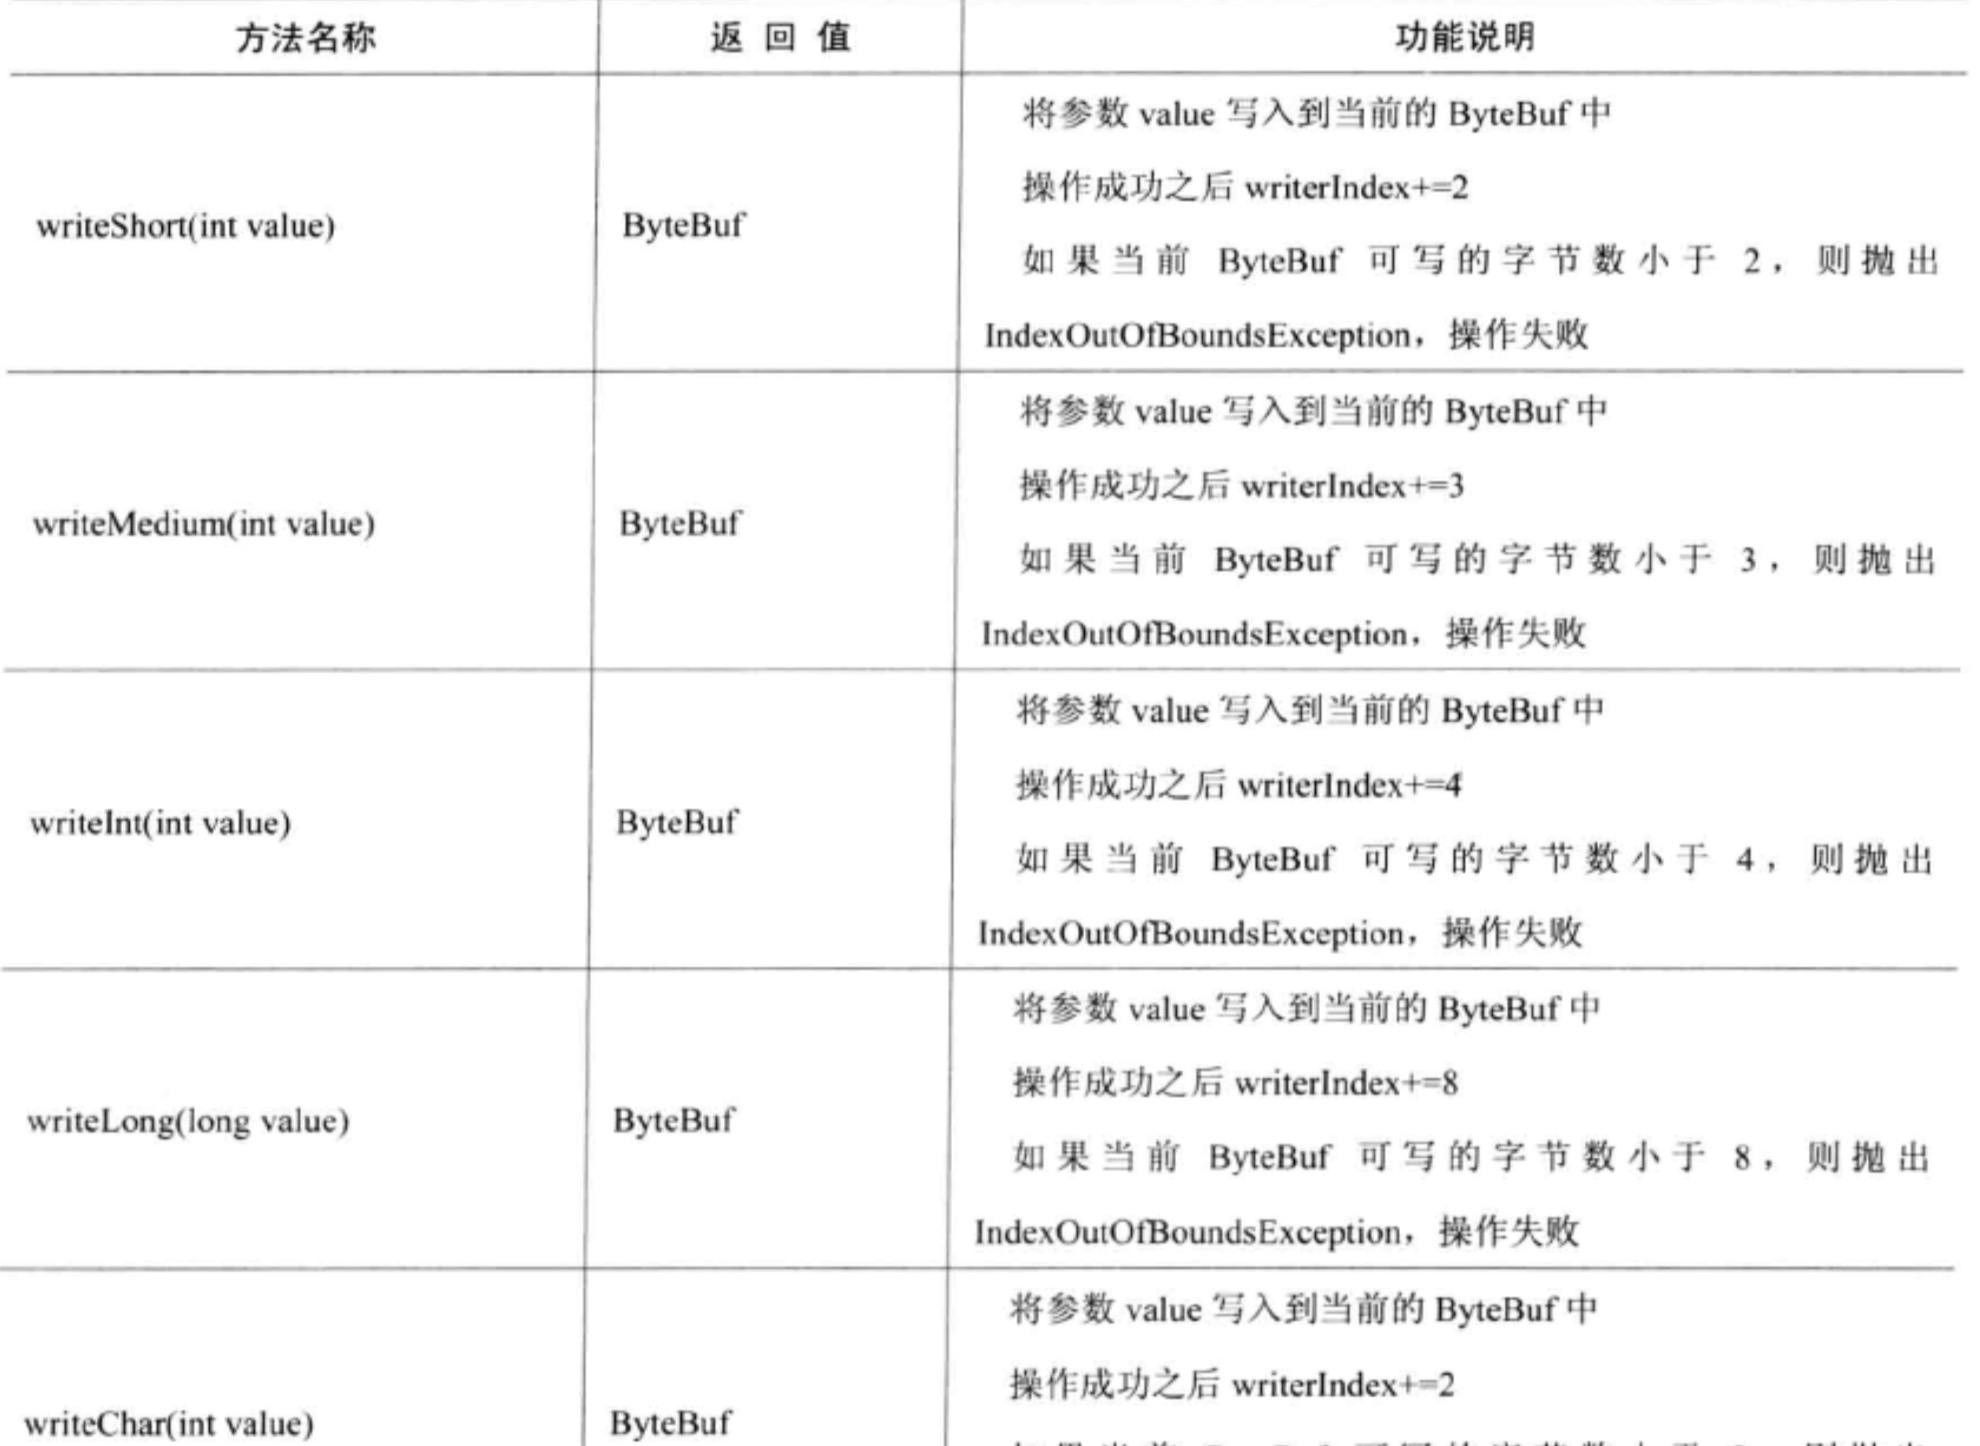
public ByteBuf writeShort(int value) {
ensureWritable0(2);
_setShort(writerIndex, value);
writerIndex += 2;
return this;
}
@Override
public ByteBuf writeInt(int value) {
ensureWritable0(4);
_setInt(writerIndex, value);
writerIndex += 4;
return this;
}
@Override
public ByteBuf writeLong(long value) {
ensureWritable0(8);
_setLong(writerIndex, value);
writerIndex += 8;
return this;
}
@Override
public ByteBuf writeChar(int value) {
writeShort(value);
return this;
}
//Float.floatToRawIntBits 转化int
@Override
public ByteBuf writeFloat(float value) {
writeInt(Float.floatToRawIntBits(value));
return this;
}
//Double.doubleToRawLongBits 转化long
@Override
public ByteBuf writeDouble(double value) {
writeLong(Double.doubleToRawLongBits(value));
return this;
}
|
b. writeBytes(byte[] src, int srcIndex, int length)
1
2
3
4
5
6
7
8
|
    @Override
    public ByteBuf writeBytes(byte[] src, int srcIndex, int length) {
        ensureWritable(length);
        setBytes(writerIndex, src, srcIndex, length);//setBytes抽象方法
        writerIndex += length;
        return this;
    }
|
(3).Discardable 丢弃已读的数据
 1
 2
 3
 4
 5
 6
 7
 8
 9
10
11
12
13
14
15
16
17
18
19
20
21
22
23
24
25
26
27
28
29
30
31
32
33
34
|
 @Override
    public ByteBuf discardReadBytes() {
        ensureAccessible();
        if (readerIndex == 0) {
            return this;
        }

        if (readerIndex != writerIndex) {
            setBytes(0, this, readerIndex, writerIndex - readerIndex);//移动元素
            writerIndex -= readerIndex;
            adjustMarkers(readerIndex);
            readerIndex = 0;
        } else {
            adjustMarkers(readerIndex);
            writerIndex = readerIndex = 0;
        }
        return this;
    }
    //调整标记markedReaderIndex,markedWriterIndex
    protected final void adjustMarkers(int decrement) {
        int markedReaderIndex = this.markedReaderIndex;
        if (markedReaderIndex <= decrement) {
            this.markedReaderIndex = 0;
            int markedWriterIndex = this.markedWriterIndex;
            if (markedWriterIndex <= decrement) {
                this.markedWriterIndex = 0;
            } else {
                this.markedWriterIndex = markedWriterIndex - decrement;
            }
        } else {
            this.markedReaderIndex = markedReaderIndex - decrement;
            markedWriterIndex -= decrement;
        }
    }
|
discardSomeReadBytes一个判断readerIndex >= capacity() >>> 1,就是说readerIndex大于等容量大小一半进行回收操作。
 1
 2
 3
 4
 5
 6
 7
 8
 9
10
11
12
13
14
15
16
17
18
19
20
21
|
  @Override
    public ByteBuf discardSomeReadBytes() {
        ensureAccessible();
        if (readerIndex == 0) {
            return this;
        }

        if (readerIndex == writerIndex) {
            adjustMarkers(readerIndex);
            writerIndex = readerIndex = 0;
            return this;
        }

        if (readerIndex >= capacity() >>> 1) {
            setBytes(0, this, readerIndex, writerIndex - readerIndex);
            writerIndex -= readerIndex;
            adjustMarkers(readerIndex);
            readerIndex = 0;
        }
        return this;
    }
|
(4). clear
1
2
3
4
5
6
|
    @Override
    public ByteBuf clear() {
        readerIndex = writerIndex = 0;
        return this;
    }
|
(5). skipBytes
在解码的时候,有时候需要丢弃非法的数据报文。非常简单,修改readerIndex即可;
1
2
3
4
5
6
|
    @Override
    public ByteBuf skipBytes(int length) {
        checkReadableBytes(length);
        readerIndex += length;
        return this;
    }
|
(7).slice 返回此缓冲区的可读字节的一部分。修改返回的缓冲区或此缓冲区的内容会影响彼此的内容,同时它们维护单独的索引和标记。
 1
 2
 3
 4
 5
 6
 7
 8
 9
10
|
   @Override
   public ByteBuf slice() {
       return slice(readerIndex, readableBytes());
   }

   @Override
   public ByteBuf slice(int index, int length) {
       return new UnpooledSlicedByteBuf(this, index, length);
   }
|
- 创建UnpooledSlicedByteBuf,包装当前ByteBuf,控制下标反问
2.AbstractReferenceCountedByteBuf 源码分析
从类的名字可以看出,该类的功能主要是引用计数,类似于JVM内存回收的对象引用计数器,用于跟踪对象的分配和销毁,用于自动的内存回收。
(1).内部结构
 1
 2
 3
 4
 5
 6
 7
 8
 9
10
11
12
13
|
public abstract class AbstractReferenceCountedByteBuf extends AbstractByteBuf {

   //CAS操作refCnt属性
    private static final AtomicIntegerFieldUpdater<AbstractReferenceCountedByteBuf> refCntUpdater =
            AtomicIntegerFieldUpdater.newUpdater(AbstractReferenceCountedByteBuf.class, "refCnt");

    private volatile int refCnt;//引用计数

    protected AbstractReferenceCountedByteBuf(int maxCapacity) {
        super(maxCapacity);
        refCntUpdater.set(this, 1);
    }
}
|
(2).retain 添加引用计数
 1
 2
 3
 4
 5
 6
 7
 8
 9
10
11
12
13
14
|
    @Override
    public ByteBuf retain() {
        return retain0(1);
    }
    private ByteBuf retain0(final int increment) {
        int oldRef = refCntUpdater.getAndAdd(this, increment);
        if (oldRef <= 0 || oldRef + increment < oldRef) {
            // Ensure we don't resurrect (which means the refCnt was 0) and also that we encountered an overflow.
            //确保我们不复活(这意味着refCnt是0),并且我们遇到了溢出。
            refCntUpdater.getAndAdd(this, -increment);
            throw new IllegalReferenceCountException(oldRef, increment);
        }
        return this;
    }
|
(3).release 减去引用计数
 1
 2
 3
 4
 5
 6
 7
 8
 9
10
11
12
13
14
15
16
|
   @Override
    public boolean release() {
        return release0(1);
    }
   private boolean release0(int decrement) {
           int oldRef = refCntUpdater.getAndAdd(this, -decrement);
           if (oldRef == decrement) { //说明减去refCnt为零
               deallocate();  //调用deallocate方法来释放ByteBuf对象
               return true;
           } else if (oldRef < decrement || oldRef - decrement > oldRef) {
               // Ensure we don't over-release, and avoid underflow.
               refCntUpdater.getAndAdd(this, decrement);
               throw new IllegalReferenceCountException(oldRef, decrement);
           }
           return false;
       }
|
4.UnpooledHeapByteBuf 源码分析
基于堆内存,没有对象池,意味着每次I/O的读写都会创建一个新的UnpooledHeapByteBuf,频繁进行大块内存的分配和
回收可能会对性能有一定的影响,但是相比于堆外内存的申请和释放,成本还是要低一些。
相比于PooledHeapByteBuf,其原理更加的简单,也不容易出现内存管理方面的问题,因此在满足性能的情况下,推荐使用
UnpooledHeapByteBuf。
(1).内部结构
 1
 2
 3
 4
 5
 6
 7
 8
 9
10
11
12
13
14
15
16
17
18
19
20
21
22
23
24
25
26
27
28
29
30
31
|
public class UnpooledHeapByteBuf extends AbstractReferenceCountedByteBuf {

    private final ByteBufAllocator alloc;
    byte[] array;
    private ByteBuffer tmpNioBuf; //写入或者读取NIO通道,就用到这个属性

    public UnpooledHeapByteBuf(ByteBufAllocator alloc, int initialCapacity, int maxCapacity) {
        super(maxCapacity);
        ...
        this.alloc = alloc;
        setArray(allocateArray(initialCapacity));
        setIndex(0, 0);
    }

    protected UnpooledHeapByteBuf(ByteBufAllocator alloc, byte[] initialArray, int maxCapacity) {
        super(maxCapacity);
        ...
        this.alloc = alloc;
        setArray(initialArray);
        setIndex(0, initialArray.length);
    }

    byte[] allocateArray(int initialCapacity) {
        return new byte[initialCapacity];
    }

    private void setArray(byte[] initialArray) {
        array = initialArray;
        tmpNioBuf = null;
    }
 }
|
(2).capacity扩容和缩小容量操作
运用System.arraycopy赋值数组元素;
 1
 2
 3
 4
 5
 6
 7
 8
 9
10
11
12
13
14
15
16
17
18
19
20
21
22
23
24
25
26
27
28
29
30
|
   @Override
    public ByteBuf capacity(int newCapacity) {
        checkNewCapacity(newCapacity);

        int oldCapacity = array.length;
        byte[] oldArray = array;
        if (newCapacity > oldCapacity) { //扩大容量
            byte[] newArray = allocateArray(newCapacity);
            System.arraycopy(oldArray, 0, newArray, 0, oldArray.length);//复制元素
            setArray(newArray);
            freeArray(oldArray);
        } else if (newCapacity < oldCapacity) {//缩小容量
            byte[] newArray = allocateArray(newCapacity);
            int readerIndex = readerIndex();
            if (readerIndex < newCapacity) {
                int writerIndex = writerIndex();
                if (writerIndex > newCapacity) {
                    writerIndex(writerIndex = newCapacity);
                }
                System.arraycopy(oldArray, readerIndex, newArray, readerIndex, writerIndex - readerIndex);
            } else {
                setIndex(newCapacity, newCapacity);
            }
            setArray(newArray);
            //空方法
            freeArray(oldArray);
        }
        return this;
    }
|
(3).read基本数据byte,short,int,long
 1
 2
 3
 4
 5
 6
 7
 8
 9
10
11
12
13
14
15
16
17
|
   @Override
    protected byte _getByte(int index) {
        return HeapByteBufUtil.getByte(array, index);
    }
  @Override
   protected short _getShort(int index) {
       return HeapByteBufUtil.getShort(array, index);
   }
   @Override
   protected int _getInt(int index) {
       return HeapByteBufUtil.getInt(array, index);
   }
   @Override
   protected long _getLong(int index) {
       return HeapByteBufUtil.getLong(array, index);
   }
|
最终调用HeapByteBufUtil,部分源码
 1
 2
 3
 4
 5
 6
 7
 8
 9
10
11
12
13
14
15
16
17
18
19
20
21
22
23
|
 static byte getByte(byte[] memory, int index) {
        return memory[index];
    }

    static short getShort(byte[] memory, int index) {
        return (short) (memory[index] << 8 | memory[index + 1] & 0xFF);
    }
    static int getInt(byte[] memory, int index) {
        return  (memory[index]     & 0xff) << 24 |
                (memory[index + 1] & 0xff) << 16 |
                (memory[index + 2] & 0xff) <<  8 |
                memory[index + 3] & 0xff;
    }
 static long getLong(byte[] memory, int index) {
        return  ((long) memory[index]     & 0xff) << 56 |
                ((long) memory[index + 1] & 0xff) << 48 |
                ((long) memory[index + 2] & 0xff) << 40 |
                ((long) memory[index + 3] & 0xff) << 32 |
                ((long) memory[index + 4] & 0xff) << 24 |
                ((long) memory[index + 5] & 0xff) << 16 |
                ((long) memory[index + 6] & 0xff) <<  8 |
                (long) memory[index + 7] & 0xff;
    }
|
说明一下,byte=8位,short=2byte=16位,int=4byte=32位,long=8byte=64位;
0xff=1111 1111;上面代码只是做位移处理获取相应值;
(4).getBytes(int index, byte[] dst, int dstIndex, int length)
1
2
3
4
5
6
|
    @Override
    public ByteBuf getBytes(int index, byte[] dst, int dstIndex, int length) {
        checkDstIndex(index, length, dstIndex, dst.length); //验证
        System.arraycopy(array, index, dst, dstIndex, length);
        return this;
    }
|
(5).wirte基本操作 byte,short,int,long
 1
 2
 3
 4
 5
 6
 7
 8
 9
10
11
12
13
14
15
16
17
18
|
 @Override
    protected void _setByte(int index, int value) {
        HeapByteBufUtil.setByte(array, index, value);
    }
 @Override
   protected void _setShort(int index, int value) {
       HeapByteBufUtil.setShort(array, index, value);
   }

   @Override
   protected void _setInt(int index, int value) {
       HeapByteBufUtil.setInt(array, index, value);
   }
   @Override
   protected void _setLong(int index, long value) {
       HeapByteBufUtil.setLong(array, index, value);
   }
|
最终调用HeapByteBufUtil,部分源码
 1
 2
 3
 4
 5
 6
 7
 8
 9
10
11
12
13
14
15
16
17
18
19
20
21
22
23
|
    static void setByte(byte[] memory, int index, int value) {
        memory[index] = (byte) value;
    }
    static void setShort(byte[] memory, int index, int value) {
        memory[index]     = (byte) (value >>> 8);
        memory[index + 1] = (byte) value;
    }
    static void setInt(byte[] memory, int index, int value) {
        memory[index]     = (byte) (value >>> 24);
        memory[index + 1] = (byte) (value >>> 16);
        memory[index + 2] = (byte) (value >>> 8);
        memory[index + 3] = (byte) value;
    }
    static void setLong(byte[] memory, int index, long value) {
        memory[index]     = (byte) (value >>> 56);
        memory[index + 1] = (byte) (value >>> 48);
        memory[index + 2] = (byte) (value >>> 40);
        memory[index + 3] = (byte) (value >>> 32);
        memory[index + 4] = (byte) (value >>> 24);
        memory[index + 5] = (byte) (value >>> 16);
        memory[index + 6] = (byte) (value >>> 8);
        memory[index + 7] = (byte) value;
    }
|
(6).setBytes(int index, byte[] src, int srcIndex, int length)
1
2
3
4
5
6
|
    @Override
    public ByteBuf setBytes(int index, byte[] src, int srcIndex, int length) {
        checkSrcIndex(index, length, srcIndex, src.length);
        System.arraycopy(src, srcIndex, array, index, length);
        return this;
    }
|
5.UnpooledDirectByteBuf 源码分析
直接内存操作DirectByteBuffer类
(1).内部结构
 1
 2
 3
 4
 5
 6
 7
 8
 9
10
11
12
13
14
15
16
17
18
19
20
21
22
23
24
25
26
27
28
29
30
31
32
33
34
35
36
37
38
39
40
41
42
43
44
45
46
47
48
49
50
51
52
53
|
public class UnpooledDirectByteBuf extends AbstractReferenceCountedByteBuf {

    private final ByteBufAllocator alloc;

    private ByteBuffer buffer;
    private ByteBuffer tmpNioBuf;
    private int capacity;  //容量
    private boolean doNotFree;

    public UnpooledDirectByteBuf(ByteBufAllocator alloc, int initialCapacity, int maxCapacity) {
        super(maxCapacity);
        ...
        this.alloc = alloc;
        setByteBuffer(ByteBuffer.allocateDirect(initialCapacity));
    }

    protected UnpooledDirectByteBuf(ByteBufAllocator alloc, ByteBuffer initialBuffer, int maxCapacity) {
        super(maxCapacity);
        ...
        int initialCapacity = initialBuffer.remaining();
        ...
        this.alloc = alloc;
        doNotFree = true;
        setByteBuffer(initialBuffer.slice().order(ByteOrder.BIG_ENDIAN));
        writerIndex(initialCapacity);
    }

    protected ByteBuffer allocateDirect(int initialCapacity) {
        return ByteBuffer.allocateDirect(initialCapacity); //创建直接内存 new DirectByteBuffer(capacity)
    }

    /**
     * Free a direct {@link ByteBuffer}
     */
    protected void freeDirect(ByteBuffer buffer) {
        PlatformDependent.freeDirectBuffer(buffer);
    }

    private void setByteBuffer(ByteBuffer buffer) {
        ByteBuffer oldBuffer = this.buffer;
        if (oldBuffer != null) {
            if (doNotFree) {
                doNotFree = false;
            } else {
                freeDirect(oldBuffer);
            }
        }

        this.buffer = buffer;
        tmpNioBuf = null;
        capacity = buffer.remaining();
    }
}
|
(2).capacity扩容或者缩小操作
 1
 2
 3
 4
 5
 6
 7
 8
 9
10
11
12
13
14
15
16
17
18
19
20
21
22
23
24
25
26
27
28
29
30
31
32
33
34
|
    @Override
    public ByteBuf capacity(int newCapacity) {
        checkNewCapacity(newCapacity);

        int readerIndex = readerIndex();
        int writerIndex = writerIndex();

        int oldCapacity = capacity;
        if (newCapacity > oldCapacity) {
            ByteBuffer oldBuffer = buffer;
            ByteBuffer newBuffer = allocateDirect(newCapacity);
            oldBuffer.position(0).limit(oldBuffer.capacity());
            newBuffer.position(0).limit(oldBuffer.capacity());
            newBuffer.put(oldBuffer);
            newBuffer.clear();
            setByteBuffer(newBuffer);
        } else if (newCapacity < oldCapacity) {
            ByteBuffer oldBuffer = buffer;
            ByteBuffer newBuffer = allocateDirect(newCapacity);
            if (readerIndex < newCapacity) {
                if (writerIndex > newCapacity) {
                    writerIndex(writerIndex = newCapacity);
                }
                oldBuffer.position(readerIndex).limit(writerIndex);
                newBuffer.position(readerIndex).limit(writerIndex);
                newBuffer.put(oldBuffer);
                newBuffer.clear();
            } else {
                setIndex(newCapacity, newCapacity);
            }
            setByteBuffer(newBuffer);
        }
        return this;
    }
|
不做具体说明,所有操作都是基于NIO的ByteBuffer类;
四、ByteBufAllocator
ByteBufAllocator是字节缓冲区分配器,根据Netty字节缓冲区的实现不同,分为两种不同的分配器
PooledByteBufAllocator和UnpooledByteBufAllocator。他们提供了不同ByteBuf的分配方法。
五、CompositeByteBuf 源码分析
CompositeByteBuf是一个虚拟的Buffer,它可以将多个ByteBuf组装为一个ByteBuf视图。在Java NIO中,我们有两种实现的方法:
- 将其他ByteBuffer的数据复制到一个ByteBuffer中,或者重新创建一个新的ByteBuffer,将其他的ByteBuffer复制到新建的ByteBuffer中。
- 通过容器将多个ByteBuffer存储在一起,进行统一的管理和维护。
1.数据结构
(1).Component
 1
 2
 3
 4
 5
 6
 7
 8
 9
10
11
12
13
14
15
|
   private static final class Component {
       final ByteBuf buf;
       final int length;  //长度
       int offset;        //开始偏移量
       int endOffset;     //截止偏移量

       Component(ByteBuf buf) {
           this.buf = buf;
           length = buf.readableBytes();
       }

       void freeIfNecessary() {
           buf.release(); // 我们不应该在这里得到NPE。如果是这样,那一定是一个错误
       }
   }
|
(2).ComponentList继承ArrayList集合,把ByteBuf关联起来
 1
 2
 3
 4
 5
 6
 7
 8
 9
10
11
12
|
    private static final class ComponentList extends ArrayList<Component> {

        ComponentList(int initialCapacity) {
            super(initialCapacity);
        }

        // Expose this methods so we not need to create a new subList just to remove a range of elements.
        @Override
        public void removeRange(int fromIndex, int toIndex) {
            super.removeRange(fromIndex, toIndex);
        }
    }
|
形成ComponentList结构
1
2
3
4
5
6
|
      +-------------------++-------------------++-------------------+
      | Component 0       || Component 1       || Component 2       |
      | length=10         || length=12         || length=10         |
      | offset=0          || offset=10         || offset=22         |
      | endOffset=10      || endOffset=22      || endOffset=32      |
      +-------------------++-------------------++-------------------+
|
2.添加对集合元素添加以及offset和endOffset赋值操作
3.删除集合元素的批量更新offset和endOffset赋值操作
 1
 2
 3
 4
 5
 6
 7
 8
 9
10
11
12
13
14
15
16
17
18
19
20
21
22
23
24
25
26
27
28
29
30
31
|
    public CompositeByteBuf removeComponent(int cIndex) {
        checkComponentIndex(cIndex);
        Component comp = components.remove(cIndex);
        comp.freeIfNecessary();
        if (comp.length > 0) {
            // Only need to call updateComponentOffsets if the length was > 0
            updateComponentOffsets(cIndex);
        }
        return this;
    }
   private void updateComponentOffsets(int cIndex) {
        int size = components.size();
        if (size <= cIndex) {
            return;
        }

        Component c = components.get(cIndex);
        if (cIndex == 0) {
            c.offset = 0;
            c.endOffset = c.length;
            cIndex ++;
        }

        for (int i = cIndex; i < size; i ++) {
            Component prev = components.get(i - 1);
            Component cur = components.get(i);
            cur.offset = prev.endOffset;
            cur.endOffset = cur.offset + cur.length;
        }
    }
|
